Last updated: April 23, 2026
Available with any of the following subscriptions, except where noted:
-
 Seats required for certain features
-
Additional subscriptions required for certain features
Records are where you can view, edit, and retrieve information on your customers and business processes, maintaining consistency across your organization (e.g., contacts, deals, appointments, or custom objects). Once created, you can store relevant information and maintain relationships between records by interacting with them. For example, to view all purchases a deal is associated with, you can navigate to the deal record and review all associated line items on the right sidebar.
Before you get started
A record contains three main sections: the left sidebar, middle column, and right sidebar. The following information applies to records by default, but you can customize your record layouts and information resulting in a different layout from the default. If you're on a mobile device, learn how to work with records in the HubSpot mobile app
- If your account was created after March 30, 2026 and has a Free or Starter subscription, refer to the updated record layout article.
- If your account record defaults were reset by a Super Admin, refer to the updated record layout article.
View a record
- Navigate to your records (e.g., In your HubSpot account, navigate to CRM > Companies.).
- On the record index page, click the name of the record you want to work with.

Left sidebar
The left sidebar of a record includes actions such as logging activity or following a record so you're notified about changes. It also includes a property card with details about the record. Each card can be collapsed, and if allowed by your account's Super Admins, you can rearrange the cards by dragging them. Learn how you can customize the left sidebar for all users and teams.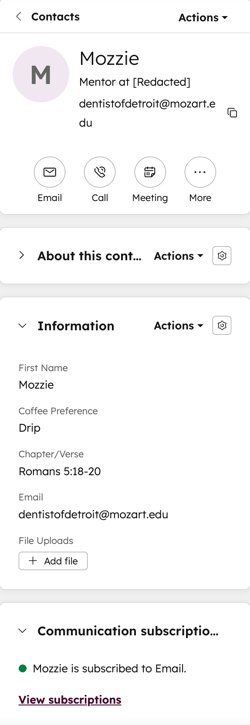
Take actions on a record
Subscription required A Professional or Enterprise subscription is required to use the View record access tool.
At the top of the left sidebar, you can:
- Click the name of the record you want to work with.
- At the top of the left sidebar, click Actions, then select from the following:
- Follow/Unfollow: click to follow/unfollow the record. By default, you follow all records you own. By following a record, you'll receive notifications on updates to the record.
- View all properties: click to view a list of the record's properties. The list is grouped by the property configuration (e.g., Contact information, Email information).
- View property history: click to view a table displaying the history of the record's property values. The table includes data such as the property name, change source (e.g., name of a user or workflow), and timestamp.
- View association history: click to view a table displaying the history of the record's associated records and engagements.
- Review associations: click to view a table displaying the current associated records. You can filter by object or association label and bulk remove associations.
- Summarize: click to open Breeze Assistant and generate a summary of the record.
- Search in Google: for contacts and companies, click to search the record's name on Google.
- Opt out of email: for contacts, click to turn off email communication with the contact's email address.
- Restore activity: click to view and restore associated engagements that were deleted within the last 90 days.
- View record access: click to view which users and teams can view or edit the record. Learn more about managing record access.
- Merge: click to merge the record with another. Learn more about what happens when you merge a record.
- Clone: click to clone the record. Learn more about cloning records.
- Delete: click to delete the record. Learn more about the data lost during a deletion.
- Export contact data: for contacts, click to export the contact's personal data.
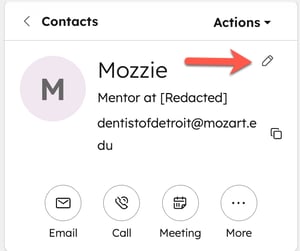
View and edit the primary properties
The primary and secondary properties for a record are located at the top of the left sidebar. For example, First name, Last name, and Job title are the primary properties for contacts.
To edit the primary display properties:
- Click the name of the record you want to work with.
- Hover over the properties and click the edit icon or value.
- Enter a value.
- When you're finished, click Save.
Add activities to the record
- Click the name of the record you want to work with.
- At the top of the left sidebar, click an icon. By default, icons for note, email, call, task, and meeting are shown. To customize the activity icons:
- Click the More button, then select Reorder activity buttons.
- In the dialog box, click the dropdown menus to select the order in which icons will appear on all records. You can also select Empty if you want to remove certain icons.
- Click Save.
View and edit other properties
Permissions required Super Admin or Customize record page layout permissions are required to add custom cards and set defaults for all users in the account.
Aside from the primary display properties, you can view and edit the record's property values on the About this [record] card. Users can also add custom cards and set defaults for all users in the account.
Learn how to edit the properties that appear in the left sidebar for your view.
- Click the name of the record you want to work with.
- In a displayed left sidebar card, hover over a property and click the edit icon.
- Enter or select a value depending on the property field type.
- Click the name of the record you want to work with.
- In a displayed left sidebar card, hover over a property and click Details.
- In the right panel, review the previous values, sources of change (e.g., a workflow or a user), and the timestamps.
Learn more about reviewing the entire property history for a record.
Middle column
The middle panel of your record includes tabs that display: a timeline of activities, an overview of the record's associations and important properties, and custom tabs. The first time you view a record, you'll be brought to the Overview tab by default. Moving forward, you'll be brought to the tab you've visited most recently, either Activities or Overview.
Use the overview tab
This tab displays a high-level overview of the record such as recent or upcoming activities, properties, and associations.
To access the record overview:
- Navigate to your records.
-
Click the name of the record you want to work with.
-
In the middle column, click the Overview tab.
-
Navigate through the list of cards.
-
In the upper right of the middle column, click Customize to edit the cards displayed.
Use the activity timeline
This tab shows activities related to the record in chronological order, with upcoming activities at the top. For example, review contact form submissions on contacts or associated company timelines.
To access the activity timeline overview:
- Click the name of the record you want to work with.
- In the middle column, click the Activities tab.
Learn how to:
- Filter and manage your activity timeline.
- Manually log activities.
- Edit, pin, comment, or delete activities.
- Mention a user on a logged activity.
Right sidebar
The right sidebar of your record includes previews of associated records and attachments. Depending on the object, your HubSpot subscription, and your customizations, this sidebar may include cards for other tools (e.g., segment memberships, playbooks, and salesforce sync).
Each card can be collapsed, and if allowed by your account's Super Admins, you can rearrange the cards by dragging them.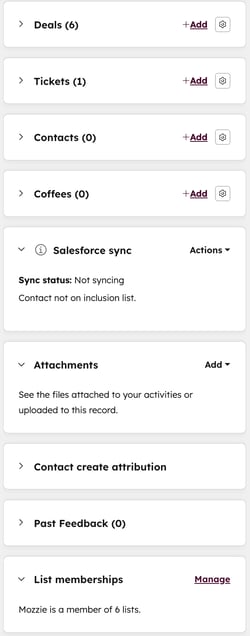
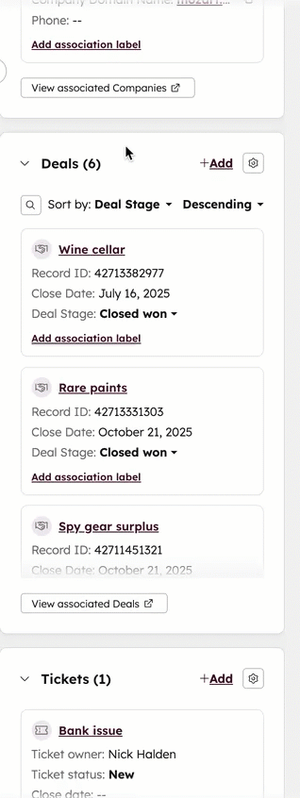
View associated records
Record associations are displayed as preview cards under the respective record card on the right sidebar (i.e., Companies, Deals, Tickets). You can customize your records to create custom association cards and edit the details shown for associated records.
To edit the display of the associated record cards:
- Click the name of the record you want to work with.
- On the right sidebar, on a [Record name] (e.g., Deals) card, click the configure icon to customize the properties displayed and the order of the cards.
- Click the down arrow to collapse the card or the right arrow to expand it.
Learn more about adding and editing associations on records.
View other right sidebar cards
Attachments
Attach files to the record or view non-inline attachments sent as part of a logged email to a contact.

Conversations
The conversations card displays on the right sidebar of ticket records, if the ticket is associated to a thread in the conversations inbox or help desk. Click the name of the conversation to navigate directly to the conversation in help desk. The conversation will open in another browser tab where you can review the thread or follow up as needed.
Learn more about working with tickets in your inbox or help desk.
Line items
The line items card displays on the right sidebar of deal records. Line items are instances of products in your library or separately created one-offs. You can associate line items to the deal. This helps users to understand what's being sold in the deal and for how much.
Quotes
The quotes card displays on the right sidebar of deal records. When a sale is closed, you can create a quote document that you can send to contacts associated with the deal. Click Add in the Quote card to create a quote associated with the deal you're viewing.
Playbooks
Subscription required A Sales or Service Hub Professional or Enterprise subscription is required to use the Playbooks card.
Add this card to the right sidebar for all records. When interacting with a record, you can click a playbook to display certain prescribed questions or steps to guide the conversation.
Salesforce sync
Subscription required A Professional or Enterprise subscription is required to use the Salesforce sync card.
Add this card to the right sidebar for all records. It displays if the record is syncing with Salesforce through the HubSpot-Salesforce integration. If the record isn't syncing with Salesforce, or if you want to ensure the record remains synced to the Salesforce record, click Sync now.
