Last updated: April 24, 2024
Available with any of the following subscriptions, except where noted:
|
|
HubSpot users with Add & edit users permissions can customize permissions for new and existing users in their HubSpot account. If the user is customizing permissions for a user with a paid seat, they must also have Modify billing permissions.
You can also limit edit access to properties and assign content access for specific users. Learn how to access the Users & Teams settings to update user permissions.
Please note:
- Users will need to log out of the account and back in before updates to their permissions will take effect.
- When HubSpot adds new permissions to a permission set, existing users will retain the access they have and any new permissions added to the set will be turned on by default for the user.
CRM
On the CRM tab, set permissions for CRM objects and tools.
To manage user permissions for your conversations inbox, review the documentation on how to create a conversations inbox.
CRM objects
To customize which objects or activities the user can view, edit, or delete, click the object (e.g. Contacts, Companies, etc.) to expand the section.

- View: click the dropdown menu to control the set of contacts, companies, deals, tickets, tasks, notes, invoices, and individual custom objects the user can view.
- The options are All [objects], [Objects] their team owns, and [Objects] they own.
- When selecting [Objects] their team owns or [Objects] they own, select the Unassigned checkbox to allow the user to view unassigned records or activities.
- Users with [Objects] they own permissions will only see their assigned records on index pages, in the lists tool, and in reports.
- Edit: click the dropdown menu to control the set of contacts, companies, deals, tickets, tasks, notes, invoices, and individual custom objects the user can edit, merge, and import.
- The options are All [objects], [Objects] their team owns, [Objects] they own, or None.
-
- When selecting [Objects] their team owns or [Objects] they own, select the Unassigned checkbox to allow the user to edit unassigned records or activities.
- Delete: click the dropdown menu to control the set of contacts, companies, deals, tickets, tasks, notes, invoices, and individual custom objects the user can delete.
- The options are All [objects], [Objects] their team owns, [Objects] they own, or None.
-
- When selecting [Objects] their team owns or [Objects] they own, select the Unassigned checkbox to allow the user to delete unassigned records or activities.
Please note:
- View permissions are not the same as a View-only Seat. Learn more about the different seat types and what they give a user access to.
- Users with View permissions can still create notes or tasks on records of that object. Users must have Communicate permissions to edit notes or tasks on those records, associate notes with other records, or create other activities, such as emails, calls, and meetings.
- Ownership permissions are based on the default owner properties and custom HubSpot user field type properties. Users who are set as the owner with either type of property have owner access to the record. Users with [Objects] their team owns permissions can access records owned by any members of their assigned teams.
CRM Tools
Customize access to bulk actions, property settings, and the workflows tool.
- Communicate: click the dropdown menu to control the contacts, companies, deals, tickets, tasks, and individual custom objects a user can add an email, call, or meeting to, as well as associate these activities with other records.
- The options are All records, Records their team owns, Records they own, and None.
- When selecting Records their team owns or Records they own, select the Unassigned checkbox to allow the user to communicate with unassigned contacts and companies.
- This only applies to CRM emails, not marketing emails. Learn more about setting permissions for marketing emails.
- Bulk delete: toggle the Bulk delete switch on to let the user bulk delete contacts, companies, deals, tickets, and tasks. This would allow the user to delete contacts from within a list or dashboard, for example. Users without this permission can still delete contacts, company, deals, tickets, and tasks from individual records if they have the Edit permission for Contacts. Users with this permission can also delete leads in the prospecting workspace.
- Import: toggle the Import switch on to let the user import CRM records in bulk or one at a time in your HubSpot account.
- Export: toggle the Export switch on to let the user export CRM records and reporting data from your HubSpot account.
- Custom views (Professional and Enterprise only): toggle the Custom views switch on to let users create, edit, and delete custom views in the inbox.
- Customize middle column layout: toggle the Customize middle column layout switch on to let the user update the content and appearance of the record middle column.
Marketing
On the Marketing tab, set permissions for marketing publishing tools.
- Lists: toggle the Lists switch on to give the user access to the lists tool.
- View: toggle the View switch on to let the user view lists, but not create or edit them.
- Edit: toggle the Edit switch on to let the user create and edit lists. To add records to a static list, a user also needs Edit access for contacts and companies.
- Forms: toggle the Forms switch on to let the user access the forms tool.
Please note: to create and connect a support form to a channel, a user needs the Account Access permission. To edit a form's follow-up email a user needs Marketing Email Publish permission.
- Files: toggle the Files switch on to let the user add, edit, and delete files from within HubSpot.
- In HubSpot’s free tools, this permission allows the user to upload files such as attachments on records.
- For Starter, Professional, and Enterprise accounts, this lets users take action on files within the file manager. Users without this permission can still view files in the file manager.
- Marketing Access: toggle the Marketing Access switch on to let the user access marketing tools, such as the email tool or opting contacts out of marketing emails. This also lets the user access Website activity on contact records. With Marketing Access switched on, you can turn on more specific marketing tool permissions.
Marketing tools
- Ads: toggle the Ads switch on to give the user access to the ads tool.
- View: toggle the View switch on to let the user view ad account activity.
- Publish: toggle the Publish switch on to let the user connect accounts from supported ad networks.
- Campaigns: toggle the Campaigns switch on to give the user access to campaigns.
- View: toggle the View switch on to let the user view campaigns.
- Publish: toggle the Publish switch on to let the user manage campaigns and assets.
- Marketing email: toggle the Marketing email switch on to give the user access to marketing emails.
- View: toggle the View switch on to let the user view marketing emails, but not edit or publish them.
- Edit: toggle the Edit switch on to let the user create emails, delete emails, edit the default values for email personalization, and send test emails. They cannot send marketing emails to contacts or save emails for automation to use in workflows.
-
- Publish: toggle the Publish switch on to let the user publish and send marketing emails.
Please note:
- A user must have at least View access to unbounce a contact.
- A user must have at least View access and Website settings permission to configure email footer and styling settings.
- To publish resubscription emails, a user must have the Website settings permission.
- CTA: toggle the CTA switch on to give the user access to CTAs.
- View: toggle the View switch on to let the user view CTAs.
- Edit: toggle the Edit switch on to let the user create, edit, and delete CTAs.
- Publish: toggle the Publish switch on to let the user publish CTAs.
Please note: to create CTAs a user must have Edit or Publish access for Blog, Email, Landing pages, or Website pages.
- Marketing SMS: toggle the Marketing SMS switch on to give the user access to Marketing SMS.
- View: toggle the View switch on to let the user view SMS messages in your account.
- Edit: toggle the Edit switch on to let the user create, edit, and delete SMS messages in your account.
- Publish: toggle the Publish switch on to let the user publish and send SMS messages in your account.
- Social: click the dropdown menu to control the social accounts the user can publish to. Users with All accessible accounts, Their connected accounts, or Draft only social permissions can see all shared social accounts in social monitoring, publishing, and reports, as well as any social accounts they connected.
-
All accessible accounts: the user can publish to social accounts they connected, or to any shared social accounts. The user can also configure social settings.
-
Their connected accounts: the user can only publish to social accounts they connected.
-
Draft only (Marketing Hub Enterprise only): the user cannot publish to any social accounts, but can create draft social posts in social accounts they connected or any shared social accounts.
- None: the user has no access to the social tool, which will not appear in the navigation menu when they are logged in.
-
- Content staging: toggle the Content staging switch on to let the user access the content staging tool.
Website tools
- Blog: toggle the Blog switch on to give the user access to blog content.
- View: toggle the View switch on to let the user view blog content.
- Edit: toggle the Edit switch on to let the user create, edit, and delete blog content. They cannot publish new posts or update live posts.
- Publish: toggle the Publish switch on to let the user publish and update blog content.
Please note: to view the SEO tool, a user must have at least View access to Email, Blog, Landing pages, or Website pages. To make updates to the SEO tool, a user must have at least Edit access to Email, Blog, Landing Pages, or Website pages, or have access to Website settings.
- Podcasts: toggle the Podcasts switch on to give the user access to landing pages.
- View: toggle the View switch on to let the user view podcast content.
- Edit: toggle the Edit switch on to let the user create, edit, and delete podcast content. They cannot create new podcast episodes or update live podcast episodes.
- Publish: toggle the Publish switch on to let the user publish and update podcast content.
- Landing pages: toggle the Landing pages switch on to give the user access to landing pages.
- View: toggle the View switch on to let the user view landing page content.
- Edit: toggle the Edit switch on to let the user create, edit, and delete landing page content. They cannot create new pages or update live pages.
- Publish: toggle the Publish switch on to let the user publish and update landing page content.
- Website pages: toggle the Website pages switch on to give the user access to website pages.
- View: toggle the View switch on to let the user view landing website page content.
- Edit: toggle the Edit switch on to let the user create, edit, and delete website page content. They cannot create new pages or update live pages.
- Publish: toggle the Publish switch on to let the user publish and update website page content.
- Website database (Content Hub only): toggle the Website database switch on to give the user access to website database table customization settings. You must turn on Website database table settings to create, clone, and delete tables.
- View: toggle the View switch on to let the user see data within the table rows and export data. They cannot add additional data.
- Edit: toggle the Edit switch on to let the user add rows to a table, clone locked rows, import data, and export data.
- Publish: toggle the Publish switch on to let the user add new rows, edit existing rows, and delete rows from a table.
- URL Redirects: toggle the URL Redirects switch on to give the user access to URL redirects.
- View: toggle the View switch on to let the user view redirected URLs.
- Publish: toggle the Edit switch on to let the user create, edit, and delete URL redirects
- Design tools: toggle the Design tools switch on to let the user edit templates and modules. Users with this permission can also access the template marketplace and save marketing emails as templates.
Please note: it's recommended to also give a user Global content settings and Website Settings permissions if they'll need to edit global web assets and blog/website settings.
Approvals
Customize permissions to approve content publishing. Approvals must be turned on for each tool.
- Approve marketing emails: toggle the switch on to let the user approve requests to publish marketing emails.
- Approve blog posts: toggle the switch on to let users approve requests to publish blog posts.
- Approve landing pages: toggle the switch on to let users approve requests to publish landing pages.
- Approve website pages: toggle the switch on to let users approve request to publish website pages.
Sales
On the Sales tab, set more granular permissions and restrictions for sales tools such as products and templates, as well as assign paid Sales Hub seats.
- Create custom line items: this is turned on by default and lets the user create line items from a deal record or quote.
- Manage payment links: toggle the switch on to let the user manage one-time and recurring payment links.
- Manage payments and subscriptions: toggle the switch on to let the user view transaction history, download reports, send receipts, cancel subscriptions, and issue refunds.
- Sales Access: click to toggle the Sales Access switch on to let the user access sales templates, snippets, documents, calling, and the meetings tool, as well as the option to connect their personal email. With the switch on, more granular permissions will appear for HubSpot's sales tools.
- Templates: click to toggle Templates switch on to let the user create, edit, and delete templates. Users with assigned Sales Hub and Service Hub paid seats that do not have permission to create and edit templates will still be able to view and send templates.
- Meeting scheduling pages: click to toggle the Meeting scheduling pages switch on to let the user create, edit, and delete scheduling pages for other users. A user must also have Personal email access toggled on.
- Sales Starter/Professional/Enterprise: click to toggle the Sales Starter/Professional/Enterprise switch on to let the user access sales tools available for the seat.
Please note:
- Once you toggle on Sales Starter/Professional/Enterprise, the permissions listed below will be dependent on the subscription tier of your seat.
- If you've assigned all of your paid seats, you can click Purchase another User to upgrade a user. Learn more about managing paid Sales Hub users.
-
- Forecast: customize View and Edit access to the sales forecast tool. Updating forecast permissions in Sales will also update permissions in Service.
- Users with Forecast they own permissions can only view their own forecasts.
- Users with Forecast their team owns permissions can see their own forecasts as well as their teammates within that team.
- Playbooks: customize View, Edit, and Publish access to the sales playbook tool. Updating forecast permissions in Sales will also update permissions in Service.
- Sequences: click to toggle the Sequences switch on to let users create sequences.
- Bulk enroll sequences: click to toggle the Bulk enroll sequences switch on to let users bulk enroll multiple contacts at the same time into a sequence.
- View Prospecting as another user: click to toggle the View Prospecting as another user to let users view other users' workspaces.
- Forecast: customize View and Edit access to the sales forecast tool. Updating forecast permissions in Sales will also update permissions in Service.
-
Service
- Feedback surveys: click to toggle the Feedback surveys switch on to give the user access to feedback surveys.
- View: toggle the View switch on to let the user view feedback surveys.
- Edit: toggle the Edit switch on to let the user create, edit, and delete feedback surveys.
- Knowledge base articles: customize Edit and Publish access for Knowledge Base articles.
- Templates: click to toggle the Templates switch on to let the user create, edit, and delete templates. Users with assigned Sales Hub and Service Hub paid seats that do not have permission to create and edit templates will still be able to view and send templates.
- Meeting scheduling pages: click to toggle the Meeting scheduling pages switch on to let the user share a link with customers to schedule meetings.
- Service Starter/Professional/Enterprise: click to toggle the Service Starter/Professional/Enterprise switch on to let the user access service tools available for the seat.
- Forecast: customize View and Edit access to the forecast tool. Updating forecast permissions in Service will also update permissions in Sales.
- Users with Forecasts they own permissions can only view their own forecasts.
- Users with Forecasts their team owns permissions can see their own forecasts as well as their teammates within that team.
- Playbooks: customize View, Edit, and Publish access to the service playbook tool. Updating forecast permissions in Service will also update permissions in Sales.
- Sequences: click to toggle the Sequences switch on to let users create sequences.
- Bulk enroll sequences: click to toggle the Bulk enroll sequences switch on to let users bulk enroll multiple contacts at the same time into a sequence.
- Customer Success workspace (BETA): click to toggle the Customer Success workspace switch on to create shared views, pin reports for all users, and create/edit customer health scores.
- Forecast: customize View and Edit access to the forecast tool. Updating forecast permissions in Service will also update permissions in Sales.
-
Automation
- Workflows: toggle the Workflows switch on to give the user access to workflows.
- View: toggle the View switch on to let the user view workflows.
- Edit: toggle the Edit switch on to let the user create, edit, and delete workflows. .
- Delete: toggle the Delete switch on to let the user delete workflows. The user must have Edit access as well.
- Chatflows: toggle the Chatflows switch on to let the user create, edit, and publish chatflows in your HubSpot account.
Reporting
On the Reporting tab, you can give the user the permissions to create, edit, and/or view dashboards, reports, and analytics tools. If turned off, the user won't see Reports in the main menu.
- Goals: toggle the Goals switch on to let users view, create, and edit goals. Click the View and Edit dropdown menus to control the level of access users have to view, create, and edit goals. Users must have an assigned seat to be assigned goals.
- Data quality tools access: toggle the Data quality tools access switch on to let non-super admin users access the data quality command center to monitor and clean data quality issues.
- Reports access: toggle the Reports access switch on to let the user access reporting tools, including dashboards, reports, and analytics tools. With the switch on, more granular permissions will appear for HubSpot's reporting tools.
- Dashboard, reports, & analytics: toggle the Dashboard, reports, and analytics switch on to let the user access reporting tools
-
-
- View: lets the user view dashboards, reports, and analytics tools. This is selected by default when the Reports access switch is toggled on.
-
-
-
- Edit: lets the user edit dashboards, reports, and analytics tools that they have access to. This will be selected if you grant permission to the user to create and own.
- Create/own: lets the user create and own dashboards and reports.
- Reporting datasets: toggle the Reporting datasets switch on to let the user access to reporting datasets.
- View: lets users view existing pre-built datasets to build reports using the custom report builder. This allows users to utilize pre-determined calculated fields, and filter criteria and properties to build a report.
- Edit: lets users create new datasets that can be used to create custom reports.
- Marketing reports: toggle the Marketing reports switch on to let users access marketing reports in HubSpot's analytics tools. This includes traffic analytics, page performance, competitors, tracking URL builder, events (Marketing Hub Enterprise only), and reports settings.
-
Account
On the Account tab, you can set more granular permissions for account administration.
Settings access
- Marketing contacts access: toggle the Marketing contacts access switch on to let the user set contacts as marketing contacts or non-marketing contacts.
- Personal email access: toggle the Personal email access switch on to send and track 1:1 emails from the CRM, and to access Meeting scheduling pages. Users will also be able to use the HubSpot Sales extension.
- App Marketplace Access: toggle the App Marketplace Access switch on to let the user install apps from the HubSpot Marketplace and third-party websites.
- Asset Marketplace Access: toggle the Asset Marketplace Access switch on to let the user install modules and templates from the HubSpot Marketplace.
- Permanently delete contacts: toggle the Permanently delete contacts switch on to let the user permanently delete contact records. To delete contacts, the user will also need the contact delete permission on the CRM tab.
- Edit property settings: toggle the Edit property settings switch on to let the user create, edit, and manage access to object properties in Settings > Properties.
- Subscription Type settings: toggle the Subscription Type settings switch on to let the user create, edit, and manage subscription types.
- Website database table settings: toggle the Website database table settings switch on to let the user configure table settings and create, clone, unpublish, or delete website database tables.
- Global content settings: toggle the Global content settings switch on to let the user edit global content and themes for website content.
- Website settings: toggle the Website settings switch on to let the user edit website settings. This will also give the user the ability to update the SEO tool and manage the email account settings.
- Manage product library: toggle the Manage product library switch on to let the user build a product library within your assets, and report on the performance of different products and services.
- Knowledge base settings: toggle the Knowledge base settings switch on to let the user edit the knowledge base settings. This permission will also give the user Publish access to the knowledge base tool by default.
- Customer Portal settings: toggle the Customer Portal settings switch on to let the user edit the customer portal settings. This permission will also give the user Publish access to the customer portal tool by default.
- Reports & dashboards: toggle the Reports & dashboards switch on to let the user create any report or dashboard. This permission also gives access to all analytics tools and will override any settings in the Reports permission tab.
- Domain settings: toggle the Domain settings switch on to let the user connect and edit domains.
- User table settings: toggle the User table settings switch on to let the user view the user table in their HubSpot account settings.
Please note: if the User table settings switch is off, users will still be able to view lists of users elsewhere in their HubSpot account (e.g., when reassigning a contact to another owner).
- Audit log access: toggle the Audit log access switch on to let the user access audit logs.
- Availability Management: toggle the Availability Management switch on to let the user edit team member availability.
- Security Center access: toggle the User access table switch on to allow users to access and manage HubSpot Security Health, and modify security settings.
Please note:
- Super admins can view all assets.
- A CMS or Marketing Hub Enterprise subscription is required to limit access to blog posts and pages by teams.
- Assets, such as templates, sequences, documents, and playbooks, can only be viewed by super admins, and the teams and users who have access.
User & account access
- Account Access: toggle the Account Access switch on to let users access the ability to manage user settings for your account.
- Add and edit users: click to toggle the Add and edit users switch on to let users add users, deactivate, or remove existing users from your account. You need Modify billing permissions to assign paid seats. You won't be able to assign permissions you don't have.
- Add and edit teams: toggle the Add and edit teams switch on to let users organize users into different groups that you can use to control access, filter reports, and more.
- Limit access by teams: toggle the Limit access by teams switch on to let users share assets with other users. Users with this permission have access to all assets no matter what team they're on.
- Presets: toggle the Presets switch on to let users configure users and teams within your account to choose defaults like home screen, dashboard, and language.
- Edit account defaults: toggle the Edit account defaults switch on to let users set your account's name, language, time zone, GDPR privacy settings, and default date and number format. If you're in a Professional or Enterprise account and are using multiple currencies, you have to be a Super Admin to edit the account's default currency.
- Modify billing and change name on contract: toggle the Modify billing and change name on contract switch on to let users view your account information, company information, transactions, and important documents. You also need this permission to buy new paid seats.
Please note: if you have a Marketing Hub subscription, an in-app banner will appear when you've reached 98% of your Marketing Contacts tier limit. To remove this banner, you must turn off Modify billing and change name on contract permissions.
-
- Developer apps and test accounts: toggle the Develop apps and test accounts switch on to let users add and edit developer apps and create test accounts.
Please note: you must be a super admin to access private apps.
Super Admin
Super Admin permissions give access to all the account tools and settings detailed in this article, except for paid Sales Hub or Service Hub features, which require a Sales or Service seat. Super Admins can also access the account’s API key and create and manage scheduling pages for the other users in the account. Super Admin permission sets are not modifiable.
If you remove a user as a Super Admin, their level of access will be altered depending on what new permissions they are assigned.
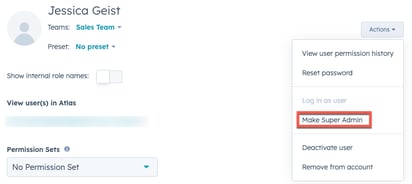
Only a Super Admin can set another user as a super admin. To make a user a Super Admin:
- In your HubSpot account, click the settings icon in the top navigation bar.
- In the left sidebar menu, navigate to Users & Teams.
- In the user table, click a user record. Then click the Actions dropdown menu on the top right, and select Make Super Admin.
If a Super Admin is required to complete a task or process, it’s recommended to have an existing Super Admin complete the task instead of updating an individual user's permissions.
Partner admin
Partner admin permissions can only be granted to HubSpot Solutions Partner employees working in your account. Partner admins have similar access to super admins. Review the differences in the table below:
| Super admin | Partner admin | Available features | |
| Elevated account access |
Yes |
Yes |
|
| Full admin privileges |
Yes
|
No
|
|
| Paid Sales or Service Hub features |
No |
Yes |
|
| Multi-account management features |
No |
Yes |
In addition, Partner admins do not have access to the following features:
- User provisioning through SCIM through Okta
- Authorization for apps that can create, update, or delete users
- Migration to other data centers
Learn how to set a HubSpot Solutions Partner employee as a Partner admin.
Partner account
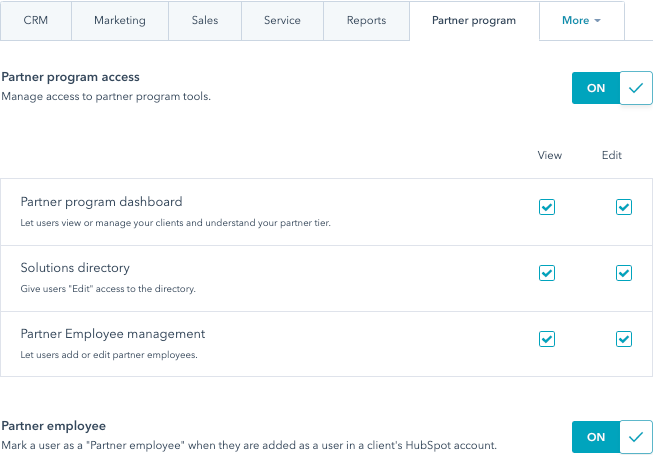
On the Partner tab, you can give a user access to partner tools in your HubSpot account and designate them as a Partner employee in client portals. By default, all new users in a partner account will not be given access to partner tools until Partner tools access is toggled on.
- Partner tools access: toggle the Partner tools access switch on to give the user access to partner tools.
- Partner dashboard: select the checkboxes to give the user Edit or View access to the partner dashboard.
- Solutions directory: select the Edit checkbox to give the user Edit access to the directory.
- Partner Employee management: select the checkbox to give the user View or Edit access to the list of partner employees for a client.
- Partner employee: toggle the Partner employee switch on in a HubSpot Partner account to mark a user as a Partner employee when they are added as a user in a client's HubSpot account.