Last updated: December 17, 2025
Available with any of the following subscriptions, except where noted:
-
 Seats required for certain features
-
Additional subscriptions required for certain features
This article references the legacy quotes tool, which is no longer available to new users. HubSpot's new AI powered CPQ offers enhanced quoting functionality, and is available with a Commerce Hub Professional or Enterprise account. If you're using a Commerce Hub Professional or Enterprise account, learn how to create quotes.
Non-Commerce Hub Professional or Enterprise accounts created before Sept. 3rd, 2025 may have access to legacy quotes:
- Users in a Free account: access to legacy quotes if one or more quotes were created in the six months prior to Sept. 3rd, 2025.
- Users in a Sales Hub account: continue to have access to legacy quotes after Sept. 3rd, 2025.
If you've lost access to legacy quotes, this is likely because you've been assigned a Commerce Hub seat. To regain access, change your seat to a core, or view-only seat.
Using HubSpot legacy quotes you can create and share quotes directly from HubSpot, and get paid using HubSpot payments or Stripe as a payment processing option . Using quotes, your buyers can expect a similar checkout process to invoices and payment links.
Additionally, you can set up e-signatures for quotes, set up quote approvals, and customize quote templates.
Set up quotes
Below, learn how to set up legacy quote settings. Before you begin, make sure the user who needs to update any of the following settings has Super Admin permissions.
Configure general quote settings
To get started, configure the following quote settings:
- Add a logo to your HubSpot brand kit: quotes will automatically pull in the logo set in your HubSpot brand default settings. Users in Sales Hub Professional and Enterprise accounts can adjust this by customizing quote templates.
- Legacy quotes will use the brand kit colors.
- Updating your logo won't update existing published legacy quotes, only currently drafted legacy quotes and legacy quotes created after updating.
- Set default payment options: optionally, you can set which payment methods your legacy quotes will accept by default in your payments settings. You can also customize this on each legacy quote during creation.
- Connect your domain to HubSpot: by default, legacy quotes are hosted on the landing page primary domain connected to your account. When creating a legacy quote, you can also select from any of your connected domains. If you haven't yet connected a domain, or would like to connect a separate subdomain for hosting legacy quotes (e.g., billing.website.com), learn how to connect a domain to HubSpot.
Allow payment of unsigned legacy quotes (Sales Hub Professional and Enterprise only)
Users with Super Admin permissions in a Sales Hub Professional or Enterprise account can turn on an option to allow legacy quotes that aren't signed, to be paid:
- In your HubSpot account, click the settings icon in the top navigation bar.
- In the left sidebar menu, navigate to Objects > Quotes.
- Toggle the Allow payment of unsigned quotes switch on.
Display total contract value on legacy quotes (Sales Hub Professional and Enterprise only)
By default, published quotes will only display the total of the line items that are due at checkout, meaning that line items that are due in the future won't be included in the total. When creating a legacy quote, you can set the quote to include future-dated line items, but you can also configure the default behavior in your legacy quote settings.
To display total contract value on quotes by default:
- In your HubSpot account, click the settings icon in the top navigation bar.
- In the left sidebar menu, navigate to Objects > Quotes.
- Toggle the Display total contract value on quotes switch on.
Set a default email address to send legacy quotes from
Set up a default email address that legacy quotes will be emailed from. The default email address can be a team email address or a personal email address. If no default email is set, the legacy quote will be sent from the personal or team email address that the user chooses when sending the quote.
To set a default email address:
- In your HubSpot account, click the settings icon in the top navigation bar.
- In the left sidebar menu, navigate to Objects > Quotes.
- Click the Default from address dropdown menu and select the email address you would like to use as the default.
- If you want to allow users to manually send quotes from their personal email address, or other team email addresses they have access to, toggle the Allow sending from other email addresses switch on.
- Click Save.
Set a default expiration period for quotes (Sales Hub Professional and Enterprise only)
Users with Super Admin permissions in a Sales Hub Professional or Enterprise account can set a default quote expiration period for all legacy quotes created in the account. After updating the default expiration period, any new quotes that you create moving forward will automatically have the set expiration date.
- In your HubSpot account, click the settings icon in the top navigation bar.
- In the left sidebar menu, navigate to Objects > Quotes.
- Next to the Set a default expiration period setting, click the dropdown menu and enter a default expiration time period.
- Click Update.
Default quote value (Sales Hub Professional and Enterprise only)
Users with Super Admin permissions in a Sales Hub Professional or Enterprise account can set a default quote value of Quote amount or Total contract value (TCV).
- In your HubSpot account, click the settings icon in the top navigation bar.
- In the left sidebar menu, navigate to Objects > Quotes.
- Next to the Default quote value setting, click the dropdown menu and select Quote amount or Total contract value (TCV).
Delete quotes on contact deletion
By default, when data privacy settings are turned on, if a contact is deleted, any quotes associated with that contact are not removed after thirty days. Turn on the Delete quotes on contact deletion setting to delete the quotes after thirty days.
Please note: all quotes will be deleted when your HubSpot account is closed.
To turn on quote deletion upon contact deletion:
- If they aren't already, turn on data privacy settings.
- In your HubSpot account, click the settings icon in the top navigation bar.
- In the left sidebar menu, navigate to Objects > Quotes.
- Toggle the Delete quote on contact deletion switch on.
Download published quotes
In your account settings, you can download published quotes:
- In your HubSpot account, click the settings icon in the top navigation bar.
- In the left sidebar menu, navigate to Objects > Quotes.
- Next to the Download published quotes setting, click Download.
Require approvals on quotes
Subscription required A Sales Hub Enterprise subscription is required to turn on quote approvals.
Seats required A Sales Hub Enterprise seat is required to turn on quote approvals.
Permissions required Super Admin permissions are required turn on legacy quote approvals.
One user in your account can be set up as an approver for legacy quotes. When turned on, all legacy quotes will need to be approved. Learn how to review and approve quotes once the setting is turned on.
Turning the setting on adds three active, quote-based workflows to your account:
- When quotes require approval.
- When changes are requested on a quote.
- When quotes are approved.
These three workflows will create tasks and update property values when the Quote approval status property is updated. All tasks and property value updates related to a quote's approval will happen automatically via these workflows.
Please note: if you downgrade a paid seat in your account, the three workflows will be deleted. Any associated quotes in a pending approval state will revert back to a draft state after the workflows are deleted.
You can further customize each of these quotes-based workflows and add actions, such as updating deal stages when a quote is signed.
To add the quote-approval workflows to your account:
- In your HubSpot account, click the settings icon in the top navigation bar.
- In the left sidebar menu, navigate to Objects > Quotes.
- Toggle the Require approvals on all legacy quotes switch on.
- In the dialog box, click the Approver dropdown menu and select a user.
Please note: you can only select one user with an assigned Sales Hub Enterprise seat as the quote approver. The selected user must also have Edit access for deals.
- Click Set approver and create workflows.

You can access and edit the workflows from the workflows tool. If the When quotes require approval workflow is turned off, users will be able to publish quotes without approval. It’s recommended to adjust workflow permissions for users if you have concerns around this.
Use e-signatures with legacy quotes
Subscription required A Sales Hub subscription is required to use e-signatures with legacy quotes.
Seats required A Sales Hub seat is required to use e-signatures with legacy quotes.
An electronic signature, or an e-signature, is a person's electronic expression of agreement to the terms of a particular document. E-signatures are valid and legal in the United States, Canada, the European Union, the UK, and many other countries. They have the same legal weight as written signatures. HubSpot’s e-sign feature is powered by Dropbox Sign (formerly HelloSign).
Below, learn more about e-signatures and how to e-sign a legacy quote.
Before you get started
- You don't need to create an account with Dropbox Sign in order to use e-sign as part of the regular quote creation process within HubSpot.
- Users with a core seat can't configure a quote with an e-signature, but can be set as the quote sender by another user, or as a countersigner.
Understand e-signature limits
Each HubSpot account has a pooled limit of e-signatures based on the subscription and number of paid users. You can review the e-signature limits for your subscription in HubSpot's Products & Services catalog and by checking your account's e-signature usage.
For example, for legacy quotes:
- An account with Sales Hub Starter subscription has 10 e-signatures available to all users in the account. Note that this is not 10 e-signatures per user, but 10 for use across the account by all users. Adding more seats will not increase the e-signature limit.
- Users with an assigned Sales Hub seat, that are part of an account with a Sales Hub Professional subscription, have 10 e-signatures available to use. Note that this is 10 e-signatures per paid seat. If the account has five users, each with an assigned Sales Hub seat, the account would have a base e-signature limit of 50 per month, because the limit is pooled between all users with seats. One user could use 30 e-signatures in a month, resulting in 20 remaining for other users with seats. Users with a core seat can't configure a quote, but can be set as the quote sender by another user, or as a countersigner.
- Users with an assigned Sales Hub seat, that are part of an account with a Sales Hub Enterprise subscription, have 30 e-signatures available to use. Note that this is 30 e-signatures per paid seat. If the account has five users, each with an assigned Sales Hub seat, the account would have a base e-signature limit of 150 per month, because the limit is pooled between all users with seats. One user could use 30 e-signatures in a month, resulting in 120 remaining for other users with seats.
- An e-signature will count towards the limit as soon as the e-signature option is turned on for a published quote. The quote does not need to be signed to apply to the signature limit. A quote that requires multiple signatures only counts as one usage towards your limit. For example, if a published quote with the e-signature option turned on requires three signatures, this only counts as one usage towards your limit regardless of who has signed the quote.
- If a quote with an e-signature request expires or is recalled, resending the quote would count as an additional e-signature towards your limit (one e-signature for the first time the quote is sent, and another when the quote is re-sent).
Enable e-signatures on a legacy quote
To include an e-signature field on a quote, HubSpot users with a paid Sales Hub seat can select the Use signature option on the Signature & payment step of the quote builder:
- In your HubSpot account, navigate to Commerce > Quotes.
- Click the name of a draft quote, or create a new quote.
- In the bottom right of the quote editor, click Next until you've navigated to the Signature & Payment step.
- Under Signature options, select Use e-signature.
- Under Required signatures, select the contacts on the quote whose signature is required.
- Under Countersigners, select the HubSpot users whose signatures are required.

Disclaimer: HubSpot's implementation of Dropbox Sign should be eIDAS compliant, as Dropbox Sign is eIDAS compliant. This is not intended to be legal advice and should not be a substitute for professional legal advice, for which you should consult a licensed attorney.
E-sign a legacy quote
When e-signature is enabled for a legacy quote, buyers and countersigners can add their signatures to the quote.
For added security, you can turn on identity verification so that HubSpot includes a preliminary email verification step to confirm the signer's identity before allowing them to sign the quote. If you don't need identity verification, you can turn this requirement off or countersigners can optionally start the signature process from within the HubSpot account, which removes the need for verification.
Both buyers and countersigners can begin the e-signature process from a shared legacy quote:
- If identity verification is turned on, verify your identity via email:
- On the shared quote, scroll to the Signature section, then click Verify to sign next to your name on the quote. An email will then be sent to you with next steps for signing the quote. You'll have one hour to complete the signature process after clicking Verify to sign.
Please note: if you don't sign the quote within one hour of clicking the Verify to sign button, you'll need to navigate back to the shared quote and click Verify to sign again to generate a new verification email.
-
- Navigate to your email inbox and look for an email with the subject line Please verify your identity to sign your quote. Click Verify your identity and sign quote to start the signature process.

-
- A new browser tab will open with a dialog box confirming your identity. Click Start signing.
- To sign, click Get started in the top right hand corner or click Click to sign on the signature box.

-
- Click Click to sign next to your name at the bottom of the quote.

-
- In the dialog box, add your signature by clicking the Draw, Type, or Upload tabs to select your method of signing. Then click Insert to add the signature.

- In the top right, click Continue.
- In the dialog box, add your signature by clicking the Draw, Type, or Upload tabs to select your method of signing. Then click Insert to add the signature.
-
- Click I agree to save your signature on the quote, or click Edit to edit your signature.
-
- Click Close.
Countersigners will receive an email notifying them that the quote has been signed. This email contains a button to start the countersign process.
Countersigners can also countersign a quote from the quotes index page:
- In your HubSpot account, navigate to Commerce > Quotes.
- You'll see your quote listed with a status of Pending signature. Hover over the quote, and click Actions, then select Countersign.
- Continue to the signature steps.
From the quotes index page, you can also review the signature status:
- In your HubSpot account, navigate to Commerce > Quotes.
- Next to a quote with pending signatures, click Actions, then click Details.
- Under Performance, you can view the signature status of the quote.

- To print a downloaded copy of the quote, hover over the quote and click Actions, then click Download.
Please note: if you download a signed quote, Dropbox Sign removes links from any hyperlinked text included in the Comments to buyer or Purchase terms section from the PDF version of the quote. It's recommended to include the full URL for the linked text so the link is still clickable after the quote is downloaded.
Your customer will receive a copy of the document that they signed once all required signatures and countersignatures have been completed. The notification that they receive includes a link to the document they signed, which expires when the quote expires, and a PDF copy of the fully signed document for their records.
Monitor e-signature usage
In your quote settings, you can view how many e-signatures you've used this month so far, along with how close to your monthly limit you are. The monthly limit resets on the first of each month.
To check your e-signature usage:
- In your HubSpot account, click the settings icon in the top navigation bar.
- In the left sidebar, navigate to Objects > Quotes.
- Click the E-signature tab.

Increase e-signature limit
Increase the number of e-signatures available in your account by contacting your customer success manager.
Manage e-signature identity verification settings
By default, e-signatures don't require identity verification during the quote signing process, but you can turn on this requirement. If you want to require buyer verification but don't need countersigner verification, you can turn the setting on and have countersigners sign from within HubSpot.
To turn identity verification on or off:
- In your HubSpot account, click the settings icon in the top navigation bar.
- In the left sidebar, navigate to Objects > Quotes.
- Click the E-signature tab.
- To turn on verification and require it when signing a quote, toggle the Identity verification switch on. Moving forward, identity verification will be required when signing a quote.
- To turn off verification, toggle the Identity verification switch off. Moving forward, identity verification will not be required when signing a quote.
Learn more about e-signing quotes.
Create a customized legacy quote template
Subscription required A Sales Hub Professional and Enterprise account is required to create customized legacy quote templates.
Permissions required Super Admin or Manage quote templates permissions are required to create or manage custom legacy quote templates.
Please note: if you have access to legacy quotes and are assigned a Commerce Hub seat, you'll lose access to legacy quotes including your quote templates, and will gain access to HubSpot's CPQ quotes. To keep using legacy quotes, and your legacy quote templates, change the Commerce Hub seat to a core, or view-only seat to access to legacy quotes. Or, learn more about HubSpot CPQ quote templates.
HubSpot provides a set of three default legacy quote templates that you can use as-is, or create new templates from. When you create a customized quote template, it'll be saved as a new template, leaving the default template in its original state.
Depending on your HubSpot subscription, you can customize legacy quote templates as follows:
- With editable modules, you can modify the template’s design and content to match your business needs.
- Child themes can be created using HubSpot's free tools. Learn more about child themes.
- Using HubSpot's free or Sales Hub Starter tools, you can edit the theme settings applied to the default quote templates included in your account, but can't create customized quote templates.
- Within all HubSpot subscription plans, you can use the design manager to create and edit quote templates. But, a Sales Hub Professional or Enterprise subscription is needed to use the templates for creating quotes. Learn more about developing a custom CMS quotes theme in HubSpot's developer documentation.
No-code customization
Below are some common examples of customizations you can make without coding, when a template is using one of the default CMS templates:
- Adding text or personalization tokens from contact, company, deal objects to quote (e.g., a VAT number, either as text or as a deal-property).
- Adding default terms and conditions (which can be protected from editing during quote creation).
- Editing logo, fonts, and colors.
- Hiding modules.
- Removing a column from the line items table, or adding a column.
- Removing the Total or Subtotal sections from the line item table.
Customization requiring a developer
Below are some common examples of customizations it's not possible to implement with the no-code template editor, but are possible if a developer creates a custom CMS template for quotes, or for some use cases, a child theme of the CMS Quotes Theme:
- Creating a custom template from scratch.
- Adding or removing modules to the template.
- Adding a column to the line item table for a custom product property.
- Having a personalization token pull in multiple values (e.g. a line item token will pull in the value of first associated line item).
- Automatically adding line items to a quote.
- Automatically adding taxes, fees, or discounts to a quote.
- Creating multiple line item tables.
- Adding sections to the line item table (e.g., if selling software and hardware, having all the software in one section and all the hardware in another section).
- Customizing the subtotals or total.
- Hiding the e-sign module.
Create a customized quote template with the no-code template editor
- In your HubSpot account, click the settings icon in the top navigation bar.
- In the left sidebar menu, navigate to Objects > Quotes.
- At the top, click the Quote templates tab.
- In the upper right, click Customize quote template.
- Hover over the template you want to start with, then click Choose.
- At the top, click the edit icon and enter a name for the quote template.
- To edit the module content, in the left panel, click a module and edit the module contents.
Please note: when using personalization tokens in a quote, HubSpot will not render them dynamically. Instead, the token is rendered at the time of publishing the quote, and will not update upon signing. For this reason, you should not use personalization tokens for properties that are updated after a quote is published, including: Payment status, Payment date, e-sign date, and e-sign completed signatures.
- To edit how the line items table will look to buyers, click the Line items table module:
- To rearrange the order of the line items properties, click the drag handle to drag and drop the properties to another position.
- If you don't want the subtotals, fees, or totals to appear on the quote, clear the checkboxes next to the value.
- If you want to add products that'll appear by default on a template, use the design manager. CPQ quote templates offer the option to add products to the line item table in the template editor.
- Continue to navigate the editable modules in the left panel, making changes to the images, text, and headings included in the quote template. On the right, access a preview of your changes.
Please note: when editing the Comments or Terms module, do not delete the Terms or Comments to buyers tokens that appear in these modules. If the tokens are deleted, any text that your users include in these modules in the quote editor will not populate on the published quote.
- Click the Settings tab.
- To set a default domain for the quote template, click the Domain dropdown menu.
- To select a default language for module titles and labels in the template, click the Language dropdown menu. Keep in mind that any customized content you've already included in the template will be removed when changing the language. In the dialog box, click Remove content.
Please note: content added to the quote template in a rich text module will not be automatically translated. Sample data will also not translate in the template preview.
- Depending on the language you select, you can also set the default locale to format dates and addresses in. Click the Locale dropdown menu and select a locale.
- To edit the color, font, button, and banner styles, click Edit theme settings.
- To edit the global colors used in the quote theme, click to expand the Global colors section. You can also edit the button colors or banner text colors by clicking to expand the Button settings or Banner settings section. Set your color by entering a hexadecimal value, or by clicking the color picker.
- To edit the global font used in the quote theme, click to expand the Global fonts section, then click the dropdown menus to select a font.
- To edit the template in the design manager, click Edit CMS template.
- When you're done customizing your quote template, in the upper right, click Save.
Your team can now select the customized quote template when creating a legacy quote. After publishing your quote, learn how to share your quote with your contacts.
Manage legacy quote templates
If using HubSpot's free tools or Sales Hub Starter, Super Admins can edit the theme settings of the default legacy quote templates included in the account. If using Sales Hub Professional or Enterprise, Super Admins can edit the default legacy quote templates, and the customized legacy quote templates in the account:
- In your HubSpot account, click the settings icon in the top navigation bar.
- In the left sidebar menu, navigate to Objects > Quotes.
- Click the Quote templates tab.
In the Default quote templates section, you can manage the three templates that come with your account. To view template options, hover over the default template, then click the Actions dropdown menu, and select an option:
- Preview: view what a quote created from the template would look like.
- Edit theme: edit the template's theme. The default templates use the same theme, so any changes made will affect all three templates.
- Use template: create a new quote from the template.
- Hide in quotes: prevent the template from appearing as an option when creating a new quote. You can later switch this back by selecting Show in templates in the dropdown menu.
- Edit: edit the quote template. In the template editor, you can also edit the template's theme in the Settings tab.
- Clone: create a copy of the quote template.
- Use template: create a new quote from the template.
- Hide in quotes: prevent the template from appearing as an option when creating a new quote. You can later switch this back by selecting Show in templates in the dropdown menu.
- Delete: delete the template.
Create legacy quotes
Create legacy quotes to share with contacts interested in buying a product or service from your company. Use the legacy quotes tool to create a web page that includes pricing information for line items. If you're using the HubSpot and Shopify integration, you can add products created through the integration.
To collect digital payments through legacy quotes, you'll need to set up either Stripe as a payment processing option or the HubSpot payments tool (Starter, Professional, or Enterprise only).
To create a quote from a contact, company, or deal record:
- Navigate to your record:
- In your HubSpot account, navigate to CRM > Contacts.
- In your HubSpot account, navigate to CRM > Companies.
- In your HubSpot account, navigate to CRM > Deals.
- Click the name of the record you want to create the quote from.
- In the right sidebar, in the Quotes section, click + Add.

- You can also create a quote from the line item editor of a deal.
To create a quote from the quotes index page:
- In your HubSpot account, navigate to Commerce > Quotes.
- In the upper right, click Create quote.
Build your quote
After creating your quote, build your quote to add an associated deal, buyer information, your company information, and payment details.
Deal
Associate your legacy quote to a new or existing deal.- To associate the quote with an existing deal, click the Associate with a deal dropdown menu and select an existing deal.
- To create a new deal for the quote, click the Associate with a deal dropdown menu and select Create a new deal. In the right panel, enter the details of the deal. Then click Create. To customize the properties that appear, click Edit this form at the top.
Please note:
- If associating a quote to an existing deal, the deal amount will be updated if you have a default deal setting other than Manual entry. The line items will also update on the deal to reflect the ones on the quote.
- If adding multiple quotes to deals, the deal amount and line items will reflect the latest published quote. For example, if you add a quote with two line items that total $100, then later add a second quote with three line items that total $150, the deal amount will be $150 and the deal will show three line items.
- Deals created through ecommerce integrations, such as Shopify, cannot be associated with quotes.
- The quote preview shown in the right panel is based on the last template that you used for creating a quote. You can update this preview by proceeding to the next section, then selecting another template.
- The quote's currency will reflect the associated deal's Currency property. Learn more about the supported currencies when using HubSpot payments, or Stripe as your payment processing option.
- Click Next.
- Continue setting up your legacy quote following the steps below. You can save the quote as a draft at each step by clicking Save, then clicking Exit in the bottom left. You can access the draft quote for editing, and drafted quotes can be enrolled in workflows.
Buyer Information
Add contacts and a company to your legacy quote. If you selected an existing deal, HubSpot will automatically add contacts and the primary company associated with the deal to the quote.
- To edit contact (e.g., job title) or company information (e.g., company address) , click the contact or company name, update their details in the right panel, then click Save.
Please note: if updating contact or company information, the updates will be saved to their record in the CRM.
- To remove a contact or company from the quote, clear the checkbox next to their name.
If you created a new deal and didn't associate a contact or company, or associated a deal that doesn't have an associated contact or company, you'll need to add them:
- Click Add contact.
- To add an existing contact, in the right panel, use the search bar to find a contact, select the checkbox next to the name of the contact you want to add, then click Next.
- To add an association label, click + Add association label, click the Labels dropdown menu, select the association label, then click Save.
- To add a new contact, in the right panel, click the Create new tab.
- Enter the contact details. Once you've filled in the contact's name or email, additional fields will appear. To customize the properties that appear, click Edit this form at the top.
Please note: it is not recommended to add contacts to your account without an email address because HubSpot uses the email address to deduplicate contacts and automatically associate contacts with companies.
-
- If you've turned on data privacy settings in your account, select options that indicate the legal basis for processing the contact's data.
- If your account has marketing contacts, select the Set this contact as a marketing contact checkbox to set the contact as Marketing. If you don't select this while creating the contact, you can set the contact as marketing later.
- Once you're done, click Create. To save and create another contact, click Create and add another.
- To add additional contacts, click + Add another contact.
- To add a company, click Add company.
- To add an existing company, in the right panel, use the search bar to find a contact, select the company , then click Next.
- To add an association label, click + Add association label, click the Labels dropdown menu, select the association label, then click Save.
- To add a new company, in the right panel, click Create new.
-
- In the right panel, enter the properties of the company. Once you've filled in the company's name or domain name, additional fields will appear. To customize the properties that appear, click Edit this form at the top right.
-
- In the Associate company with section, search for and select records the company is related to. To customize the associations that appear, click Edit this form at the top.
- Once you've filled in the company information, click Create at the bottom.
- Click Next.
Please note: the company country displayed in a quote is populated by the information in the company country default property. A custom default property cannot be created to change this information.
Your Information
Verify that your personal information and company information is correct. By default, your personal information is populated by your profile and preferences and your company's information is populated from your account settings.
Please note: updating your profile information will not update previously created quotes. To update your information on a quote that has already been created, you can manually update your details.
To edit the Quote sender information for an individual quote:
- Click your name.
- In the right panel, update the personal information. This can be changed to another HubSpot user's information if needed.
Please note: if you update the job title of a user, it will save the title for all future quotes. It can be edited again on future quotes.
- Click Save.
- To edit the company information:
- Click the company name.
- In the right panel, update the company information.
- Click Save.
- Click Next.
Please note: changes made will only affect the quote you are editing.
Add line items
Add line items, including discounts, taxes, and fees, and payment schedules to legacy quotes.
Any changes made in the line items section will update the line items listed on the associated deal record. If the deal record is associated with multiple quotes, only the line items from the most recently created quote will appear in the line item card on the deal record.
- Click Next until you reach the Line Items step of the quote creation process.
- To add a line item, click Add line item in the upper right, then select one of the following:
- Select from product library: add a line item based on a product in your product library, including line items created using the HubSpot-Shopify integration. After selecting this option, you can search by product name, product description, or SKU, or click Advanced filters to refine your search. Select the checkboxes in the right panel next to the products you want to base your line item on. Then, click Add.
- Create custom line item:if you have Create custom line items permissions, this option will create a new custom line item that's unique to this individual quote. After selecting this option, use the right panel to enter your line item details, and choose whether to save the custom line item to your product library. Then, click Save or Save and add another.
- To edit, clone, or delete a line item, hover over the product, click Actions, then select an option:
- Edit: edit the line item for this quote only. The product library won't be affected.
- You can also edit individual line item's details in the columns of the line items editor, including the term, unit price, quantity, and discount amount. Enter a new value in the appropriate column. Learn how to add or remove columns.
- If setting a recurring billing frequency (e.g. monthly), a subscription will be created for the customer. Learn more about subscriptions.
- Discounts can be added to individual line items or to the entire quote.
- Taxes can be added to individual line items or to the entire quote. You can also automated sales tax when using online payments.
- Delete: delete the line item.
- Clone: create a new line item with the same details.
- To reorder the line items, click and drag a line item using the drag handle on the left of the line item.
- Edit: edit the line item for this quote only. The product library won't be affected.
- Click the Billing frequency dropdown menu to set the billing frequency of the line item. The frequency can be set to one-time, weekly, every two weeks, monthly, quarterly, semi-annually, annually, every two years, three years, four years, or five years.
Please note: when creating a quote integrated with the payments tool, if you set a line item with a recurring billing frequency's Term value to 0, the subscription will automatically renew until it is cancelled.
- By default, billing for one-time and recurring line items will start at time of checkout. To charge your buyer for an item at a later date instead, click the Billing start date dropdown menu, then select one of the following options:
-
Custom Date: a specific date in the future. After selecting this option, use the date picker to select the start date, then click Save.
-
Delayed start (days): delay the billing start date by a number of days after checkout. After selecting this option, enter a number into the Delayed billing start by days field in the right panel, then click Save.
-
Delayed start (months): delay the billing start date by a number of months after checkout. After selecting this option, enter a number into the Delayed billing start by months field in the right panel, then click Save.
-

Please note: Stripe payment processing can process recurring line items due at a later date, as long as there is at least one line item due at checkout on the quote. For example, line item 1 is due at checkout, and line item 2 is due in 30 days.
Add discounts, fees, and taxes to a quote
In the Summary section, you can add one-time discounts, fees, and taxes for the legacy quote subtotal. These added elements won't be added to the associated deal's Amount property.
Learn how to add tax rates to use across your products and services, rather than adding one-time taxes to your subtotal.
Please note:
- One-time discounts, fees, and taxes will only apply to line items charged at checkout, not items that are due at a later date.
- While the ability to add a tax, fee, or discount lives in HubSpot, your legal and accounting teams are the best resource to give you compliance advice for your specific situation.
- To add a tax, fee, or discount, click +Add [tax/fee/discount]. Learn more about discounts.
- Enter a name for the tax, fee, or discount and a value in the text field. The tax, fee, or discount value can be based on a specific currency amount or a percentage (%) of the total.
- Remove any taxes, fees, or discounts by clicking the delete icon next to the currency field.
- By default, the published quote will only display the total that's due at checkout, meaning that any line items due in the future won't be included in the total. To display the total contract value, including future-dated line items, select the Display total contract value on the published quote checkbox. You can configure the default behavior in your quote settings.

Please note:
- Up to six decimal places are supported when setting a line item's unit price in any currency and discounts are rounded based on the currency's precision at checkout. For example, if a line item has a price of $11.90 USD, and a 15% discount is applied, the discounted amount of $1.785 will be rounded to $1.79, and the total that the buyer pays will be $10.12.
- Up to two decimal places are supported when adding taxes. For taxes with more than two decimal points, HubSpot will round as follows depending on if the taxes are percentage-based or currency-based:
- Percentage-based taxes: Values 5 and below are rounded down, while values 6 and above are rounded up. For example, 9.995% would become 9.99%, while 9.996% would become 10.00%.
- Currency-based taxes: Values 4 and below are rounded down, while values 5 and above are rounded up. For example, $9.994 would become $9.99, while $9.995 would become $10.00.
Add a payment schedule
Turn on payment scheduling on legacy quotes to split payments over time, allowing you to split a total quote amount into multiple installments over a defined period. Each installment will have its own distinct due date, payment amount, and name.
For example, if you're quoting $5,000 for a machine installation, you could structure this with a payment schedule into three payments over six months:
Payment 1 (Due on acceptance): $2,500.
Payment 2 (Due in 3 months): $1,250.
Payment 3 (Due at project sign off): $1,250.
When collecting payment using HubSpot payments or a connected Stripe account, the first installment is payable through the quote and all other installments will be created as Draft invoices. Whilst the following installment invoices are automatically created, they are not automatically sent, so make sure to review and send them to your buyer. Learn how to set up a payment schedule below.
Please note: payment schedules can't be configured on quotes with recurring line items or future billing start dates.
To set up a payment schedule:
- Under Payment Schedule toggle the Payment Schedule switch on.

- Choose whether to split the installment by amount or percentage by clicking the Amount dropdown menu, and choosing Amount or Percentage (%).

- Enter an installment name, amount or percentage, and due date.
- The first payment is due upon receipt. You can amend the text in the Due Date box.
- To set a future payment to be due on a specific date, use the date picker.
- To set a payment to be due based on a milestone, click the Specific date dropdown menu, then select Milestone, and enter a milestone in the text field.
- Add another payment installment by clicking + Add another installment.
- When viewing the quote, the buyer will see the total and each installment, along with when they are due.

- When the buyer pays for the quote, the invoices for the following payments will be created in the Draft status in your account. The invoices won't automatically be sent to the buyer, and future payments won't be automated. Learn how to manage draft invoices.
Review the summary of a quote
When setting up your line items, review the Summary section to understand how your buyer will be charged, including discounts, fees, and taxes.
- The Subtotal will show only the items due at checkout. Any items that'll be charged at a later date will instead appear in the Future payments total.
- All items, regardless of payment due date, will be totaled in the Total contract value.
- One-time discounts, fees, and taxes will only be applied to items due at checkout, not to items charged at a later date.

To proceed to configuring the quote's signature and payment options, click Next.
Signature & Payment
Decide how you want to collect signatures and payments for your quote. You must be enrolled in HubSpot payments, or connected Stripe as a payment processing option to accept online payments.
- Select the radio button next to a signature option:
- No signature: no signature is required to authorize the quote.
- Include space for a written signature: use a handwritten signature on a printed copy of the quote. You can later manually mark the quote as signed to indicate that all signatures are present.
- To include space for a countersignature for somebody from your team, select the Include space for a countersignature checkbox.
- Use e-signature (Sales Hub Starter, Professional or Enterprise only) users with a paid Sales Hub seat can configure the quote to include a digital signature field.
- Select the checkbox next to the contact's email whose signature is needed.
- Click the Countersigners dropdown menu and select a HubSpot user's name.
- Select the radio button next to a payment option:
- No payment: no payment will be collected using the quote.
- Stripe: select this option if you're using the Stripe payment processing option to bill your customers.
Please note: the Stripe payment processing option can process recurring line items due at a later date, if there is at least one line item due at checkout on the quote. For example, line item 1 is due at checkout, and line item 2 is due in 30 days.
-
- HubSpot payments: select this option if you're using the HubSpot payments tool to process payments from customers, then customize the quote's payment options.
Please note: when a payment is made on a quote, an invoice is automatically created if the setting to automatically create invoices is turned on in settings. Learn more about the buyer checkout experience.
- Click Next.
Template & Details
Select a template, and enter the details of your quote.
- Quote template: click the dropdown menu and select a template.
- Quote name: enter a name for your quote.
- Domain: this setting only applies if you're using a customized quote template. The domain is set by the quote template you selected. By default, the content slug uses a unique date and quote ID and doesn't need to be customized, but you can edit the page slug in the Content slug text field if needed.
- Expiration date: select an expiration date. Users in a Sales Hub Professional or Enterprise account can set a default quote expiration period in account settings. When a quote expires, your contacts can no longer access it and will be prompted to contact your team.
- Quote language: select a quote language.
- Locale: select your locale to change the date and address display format for your quote. The quote's currency format is inherited from the deal record's currency, so changing the quote's locale settings won't update the currency.
Please note: if you want to view the quote after it expires, click the quote name on the deal record, then in the dialog box, click View quote to view a PDF version. The URL of the generated PDF will expire after one hour.
- Comments to buyer: enter any additional information that'll be useful for your buyer. Use the formatting options at the bottom of the editing window to modify the text or insert a link. Click the snippets icon to enter a short, reusable block of text.
- Purchase terms: enter any rules or regulations that your buyer should be aware of. Use the formatting options at the bottom of the editing window to modify the text or insert a link. Click the snippets icon to enter a short, reusable block of text.
- To update the default color and logo that'll display, edit your sales tool branding in your account settings.
- Click Next.
Review and send the quote
Preview your quote content and then publish the quote, save it as a draft, or submit it for approval. To save the quote as a draft to edit at a later time, in the bottom right, click Save, then click Exit in the bottom left to leave the quote editor.
Please note: after saving a quote as a draft, you cannot edit the e-signature options in the Signature & Payment step. If you have quote approval workflows set up, keep in mind that quotes with a draft status can be enrolled in the workflow.
- To publish the quote, in the bottom left, click Create. If your quote requires approval, in the bottom right, click Request approval. Your account's quote approver must approve the quote before you can publish and send it to your contacts. Learn how to make requested changes to a quote.
Please note: after submitting a quote for approval, you can't edit the quote unless it is rejected by your account's quote approver.
- To copy a link to send the quote, or download a PDF of the quote:
- In the dialog box, in the Copy link, download PDF tab. A preview of the quote will display in the right panel.
- Click Copy link to copy a link to the quote.
- Click Download PDF to download a PDF of the quote.
- Click the X or click Close when you are done.

- To send the quote via email:
- In the dialog box, click the Send quote email tab.
- The To field will automatically be filled with the email address of the contact associated with the quote. To change this address, click the dropdown menu and select a contact. You can also enter a new email address and HubSpot will automatically create a contact record after sending.
- To add an email address to the Cc field, click Add Cc recipients. Click the dropdown menu, select the contacts, or enter custom email addresses. You can add up to nine email addresses in the Cc field.
- If a default email address has been set up in the quote settings, the From field will automatically be filled with the default email address. Otherwise, it'll be filled with your personal email address. If a default email has been set, but the setting to allow users to send quotes from their personal email or other team emails they have access to has been turned on, you'll be able to select a different email.
- If no default email address has been set, the email address you select will become the default address each time you send a quote, but can be changed before each time you send a quote.
- Replies to this email will be routed to the From address. If you select an email address that's being used for a connected inbox, including shared team email inboxes, you can manage follow-up in HubSpot's conversations inbox.
- In the Subject field, edit the subject of the email.
- In the Write your message here... field, enter your email message. Use the formatting toolbar at the bottom to format your text, insert links, and insert snippets.
- As you update the fields, a live preview will display in the right panel.
- To send the email, click Send quote email to send the email as displayed. The buyer will then receive an email containing the quote details with a link to view the quote in their browser, along with a PDF version of the quote as an attachment.
- To instead manually compose a one-to-one email with a link to the quote, click Create custom email in your CRM.
Learn more about managing draft and published quotes.
Make requested changes to a quote
If the quote approval setting has been turned on, and the approver has requested changes, you'll need to make changes, and re-submit the quote for approval. When a requested change is submitted, a task is automatically created, including any comments from the approver. Set up notifications to receive an alert for when you're assigned a task.
To access the task and via the navigation menu, and make the requested changes to the quote:- In your HubSpot account, navigate to CRM > Tasks.
- The task title format will be Changes requested: [Deal name}. Hover over the task and click Edit.
- In the right panel, under Notes, view the notes from the approver.
- In your HubSpot account, navigate to Commerce > Quotes.
- Click the name of the quote.
- Update the quote based on the requested changes.
- At the final step, in the bottom right, click Request approval.
- The quote will be sent for approval.
Share published quotes
There are multiple ways to share a legacy quote after it has been published:
- Email a quote from a CRM record.
- Copy the URL of a published quote that hasn't yet expired.
- Share a quote from the HubSpot mobile app.
- Insert a quote using the HubSpot mobile keyboard
Please note: published quotes cannot be redirected from one domain to another. For example, if you host your quotes on www.website.com, but later redirect that domain to www.new-website.com, quotes that were hosted on the original domain will not be redirected and will instead become error pages.
To email a legacy quote from a CRM record:
- In your HubSpot account, navigate to contacts, companies, or deals.
- Click the name of a record.
- In the left panel, click the Email icon.
- In the pop-up window, click the Quotes dropdown menu and select a quote. To share a quote via email, there must be a quote created for the deal associated with that contact or company record.

To copy the URL of a published legacy quote that hasn't yet expired:
- In your HubSpot account, navigate to Commerce > Quotes.
- Hover over the published quote, then click Actions and select Copy link.
- With the quote page URL, the contact can view the quote in their browser, download the quote, or print the quote.

To view, delete, or share legacy quotes on the HubSpot mobile app on your Android device:
- Open the HubSpot app on your Android mobile device.
- Tap Deals in the bottom navigation menu.
- Tap the deal name.
- On the deal record, tap the Quotes tab.
- The quotes associated with the deal will appear. The status and expiration date will be listed below the quote name. Tap the quote to view more details.
- To copy a quote link, download the quote, share the quote from the app, recall the quote, view line items or delete the quote, tap the menu icon next to the quote name.

You can also share a legacy quote using the HubSpot mobile keyboard on your Android or iOS device. Learn more about turning on the HubSpot keyboard in your device's settings, then access the HubSpot keyboard while using the HubSpot mobile app.

After creating legacy quotes, you can manage them from the quotes index page. Filter quotes by status or owner, or search for a specific quote to review or edit. You can also open the quotes detail page to download, clone, recall and edit, or delete the quote.
In your account settings, you can download all quotes or set a default expiration period for quotes. Learn more about reporting on quotes in the custom report builder.
You can manage quotes with a Draft status, or quotes that have been published, whether they have been e-signed, are awaiting payment, or not.
Manage quotes
Manage draft and published quotes from the quotes index page. Quotes created using the CPQ tool can't be edited by legacy quote users. Learn how to identify which quote experience you have access to. 
Manage draft quotes
To manage draft quotes:
- In your HubSpot account, navigate to Commerce > Quotes.
- Hover over a draft quote and click the Actions dropdown menu, then select one of the following options:
- Edit: edit the quote. In the quote editor, finish setting up your quote, then click Create.
- Clone: clone the quote.
- Delete: delete the quote.
Please note: drafted quotes can be enrolled in workflows.
Manage published quotes
You can manage published quotes from the quotes index page. Published quotes can have different statuses:
- Published: a published quote that doesn't have e-signature or online payments turned on.
- Pending signature: a quote awaiting e-signatures of signers, or countersigners.
- Awaiting payment: a quote with online payments enabled that's awaiting payment.
- Paid: a quote with online payments enabled that's been paid.
To manage published quotes:
- In your HubSpot account, navigate to Commerce > Quotes.
- Hover over a published quote and click the Actions dropdown menu. Depending on a quote's status and configuration, you can select from the following quote management actions:
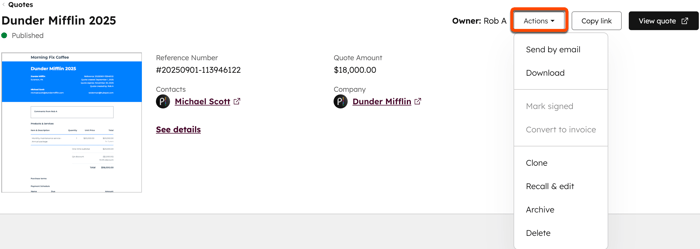
- View quote: view the quote in a new browser tab.
- Details: view the details of the quote, including reference number, quote amount, expiration date, associated contacts, associated company, and associated deal. To manage a quote from its details page, click the Actions dropdown menu in the upper right and select an action.
-
- Copy link: copy the URL link of the quote.
- Send by email: open the Send quote dialog box to send the quote via email.
- Download: download a PDF version of the quote.
- Countersign: when the quote requires an e-countersignature, select to open the quote and verify your countersignature.
- Mark signed: when the quote requires a written signature, you can manually mark the quote as signed.
- Convert to invoice: create an invoice using the quote information, including associated line items. You'll then be taken to the invoice editor to configure invoice details.
- Clone: clone an existing quote to use the same quote again. Cloned quotes include the original quote's record associations and the property values of the line items, including price, terms, and discount.
- Recall & edit: make changes and revisions to a quote that has already been published. After making your edits, the updated quote content will display whenever a contact views the quote.
Please note: quotes that have been e-signed by all parties, or have been paid, cannot be recalled and edited, or deleted. If a quote has multiple e-signatures, and not all parties have e-signed the quote, it can be recalled, edited, or deleted.
-
- Archive: mark a quote as archived to unpublish it and hide it from your default index page view. You can view your archived quotes by filtering the index page by archive status, but buyers won't be able to access archived quotes. This action can't be undone. Learn more about archiving quotes.
- Delete: delete the quote to permanently remove it from your account and prevent buyers from accessing the quote. Learn more about deleting quotes. This action can't be undone.
Request changes or approve a legacy quote
Subscription required A Sales Enterprise subscription is required to request changes to, or approve a legacy quote.
If the quote approval setting has been turned on, you can request changes or approve legacy quotes:
- In your HubSpot account, navigate to Commerce > Quotes.
- Any quote that's awaiting approval will be listed with a status of Pending approval. To view all quotes awaiting approval, above the table click Status, then select Pending approval.
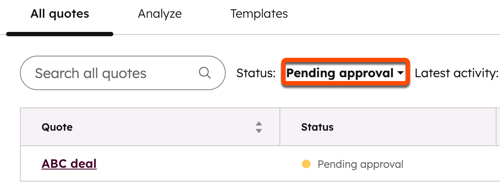
- Click the name of the quote.
- If no edits are required, in the top right, click Approve and create.
- To request changes to the quote, in the upper right, click Request changes.
- In the dialog box, in the Notes field, enter your comments, then click Request changes.
- When the edits are made and the quote is ready to be published, navigate back to the quote approval link URL. In the top right, click Approve and create.
- The quote creator will be notified that the quote was approved. They can then share the quote with contacts.
Please note: to make changes to the approved quote, you must recall and edit the quote. Learn more about recalling and editing a published quote.
Archive and delete quotes
As you create quotes, you may want to clean up your index page, remove unused quotes, or prevent buyers from seeing them. To do so, you can archive and delete quotes.
When a quote is deleted or archived it can't be restored.
- Archive a quote: archiving a quote will set the quote status to Archived, removing it from your default index page view and preventing buyers from accessing the quote. You can still view, download, clone, and delete the quote in your account.
- Quotes that have been paid, are processing a payment, or are partially signed, can't be archived.
- You can view archived quotes by using the Archive status at the top of the table on the quotes index page.

- Delete a quote: deleting a quote will remove it permanently from your HubSpot account. Users will no longer be able to view the quote in HubSpot and buyers will no longer be able to access the quote. Quotes that have been paid can't be deleted.
To archive or delete a quote:
- In your HubSpot account, navigate to Commerce > Quotes.
- Hover over the quote, click the Actions dropdown menu, then select Archive or Delete.
Export published quotes
You can download PDF versions of all published quotes in your account. Quotes that have expired will
To download published quotes:
- In your HubSpot account, navigate to Commerce > Quotes.
- In the upper right, click Actions, then select Download published quotes.
- You'll receive an email when your download is ready.
- Click Download export file in the email to download a zip file containing PDFs of all published quotes.
